Tag Archives: astrophotography

My First Dedicated Astronomy Camera

QHY183C
QHY183C sensor.

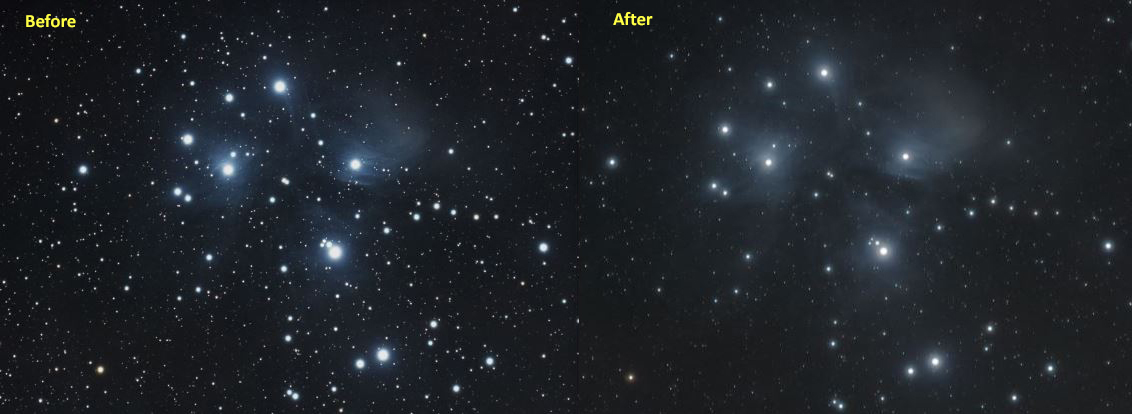
After having used a DSLR for astrophotography for as long as I can remember I decided to step things up a notch and get a dedicated astrophotography camera. The benefits over the DSLR seemed well worth the trouble of making the change.  The ability to cool the sensor and reduce noise while taking long exposures and the increased megapixel count from my Nikon D5100 were just a  couple of reasons.

QHY183C
QHY183C

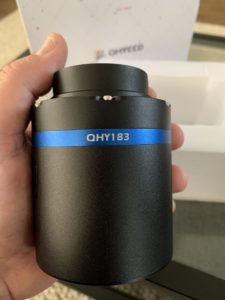
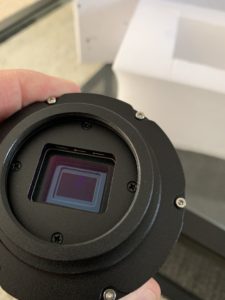
So I weighed the options between choosing a CCD (Charged Coupled Device) or CMOS (Complementary Metal Oxide Semiconductor) camera. There are pro’s and con’s associated with both devices. I won’t run down that rabbit hole in this article but I will point out that the CMOS devices have come a long way in the past decade where CCD’s typically dominated. I think it’s a fair statement to say that CCD’s were the standard high-end digital imaging device not too long ago, and at the same time they were very expensive and thus not within easy reach of most backyard imagers. CCD’s are still in use and provide amazing images but the cooled CMOS cameras with their relatively lower price have become the new standard used by amateur astronomers.  Following that lead as well as my budget pointed me to a CMOS camera.

Continue reading My First Dedicated Astronomy Camera

Astrophotography with a GoPro?

The camera’s that are now showing up in cellphones and action cameras such as GoPros have come a long way over the years. You’ve probably seen the TV commercials for the Google Pixel producing some amazing star-filled photos.  In this article I’ll focus on using a GoPro rather than a cellphone to capture astronomical images and time lapse videos.

GoPro HERO 8 BlackI have a GoPro HERO 8 Black and while it does have limitations it can produced some pretty cool astro images.

The HERO 8 Black at this writing is now a couple of years old and the HERO 10 is the latest model offered. If you are in the market for a GoPro I’d recommend the HERO 9 or 10. I have heard that the hot pixel issue discussed later in this article has been addressed or is not near as prominent in those newer models.

The HERO 8 is a waterproof (down to 33ft) action camera with HyperSmooth 2.0 video stabilization. It has a 12 megapixel camera that is capable of shooting 4K video at 60 fps.  Other built-in features include Time lapse, Time warp and Night lapse modes. There are also digital lens options including Narrow, Linear, Wide and Super View allowing the user to select the best view size for the setting.

Continue reading Astrophotography with a GoPro?

An LPS Filter Rabbit Hole

The Problem

Shooting from Bortle 8 skies with an f/5 scope means exposures get blown out or go white fairly quickly. Shooting long exposures is doable but with my skies and setup I’d greatly benefit by using a light pollution filter. But what type of filter would work best for my rig a 2″ round or clip-in, etc.  What’s available for my older Nikon D5100 DSLR and where would the optimum location for a filter reside in my light train?

With these questions in mind I ventured to find out. My first stop? A quick scan of the owner’s manual for my Meade Series 6000 70mm Quad APO Astrograph but surprisingly this revealed no information at all. There is this in the owner’s manual:Meade OM

Not much help really and the “picture” mentioned above is not actually on the whopping 2 page owner’s manual. So after searching online for information on adding a filter to my specific scope and even calling Meade Customer Service for assistance; I got nowhere. I felt sure that a filter could be added I was just seeking assistance with the best approach.

The Test

I didn’t have a 2″ filter so I bought an inexpensive 2″ Solomark Moon & Sky Glow filter for $20 bucks off Amazon mainly as something to test with before taking the plunge and buying a high dollar LPS imaging filter. I’m glad I decided on that route. I very quickly found out that the 2″ filter did fit nicely between the 48mm to 42mm adapter that is used to connect the DSLR to the telescope. The line up goes like this:  DSLR, Nikon T-Ring adapter, 48mm to 42mm adapter, Moon & Sky Glow Filter, telescope.  Success!  Not quite. Adding the filter at this point in the light train increased the distance that the camera was from the back of the scope. By pushing the DSLR back slightly I was then unable to achieve focus. The focal point with this telescope is very close to the end of the scope with the focuser almost fully racked in. There is hardly any travel to work with. Back to the drawing board.

Continue reading An LPS Filter Rabbit Hole

Photokemi Star Tools

I was recently contacted by Ken Mitchell the creator/owner of PhotoKemi Star Tools.  Ken graciously offered me the chance to obtain a copy of his PhotoKemi Star Tools as well as the PhotoKemi Star Tools Extras package in exchange for a blog post with my assessment.  I gladly jumped at the chance. What follows are my results, before and after images, and thoughts on using PhotoKemi Star Tools on several of my astro images.

So what is PhotoKemi Star Tools anyway?  It’s a collection or set of actions designed for use in Abode Photoshop specifically for editing/enhancing astrophotography images. Tasks that are typically generated manually using several simple steps to multiple steps with different tools and/or complicated iterations in Photoshop are condensed into Actions and run at the click of a button. That’s the power of PhotoKemi Star Tools.

In Photoshop they are referred to as “actions” but to me I think a more accurate name for them should be “auto tasks.” Please don’t misunderstand, I’m not saying that manually working your image in Photoshop is a “thing of the past.” Not at all, but having these auto tasks or actions at your finger tips will lighten the load and speed things up to be sure.

Beginners and experienced astrophotographers will find the PhotoKemi Star Tools action set easy to run, time saving and versatile to use when processing their images. I know I sure did. But there is another and perhaps most important aspect PhotoKemi Star Tools affords the beginner – reducing  the post processing learning curve! Let’s face it from start to finish producing a great astro image is a huge undertaking for the newbie and any benefit or edge obtained in that long and diverse sequence of tasks is welcome and appreciated. Especially when it works and works well.

M45
M45 – Before and after using PhotoKemi Star Tools. I wanted to see how much nebulosity I could bring out in my image of The Pleiades. The answer? A lot more. Some of the PhotoKemi Star Tools I just to produce the image included: nebula filter, color correction, reduce background stars, sharpen nebula and reduce star bloating.

Continue reading Photokemi Star Tools

Deep Sky Imaging

The images were stacking up! Okay, well they weren’t coming out of my ears or anything like that but I quickly determined that I needed a page on this site to make my deep sky astrophotography images available to those who wish the view them. So I did just that. There is now an appropriately named  Deep Sky Images page that can be found under the the Astrophotography menu heading on this site. There you can see all the deep sky images that I’ve posted thus far.

M45 - The Pleiades
M45 – The Pleiades

Additionally, I do have a free account on Astrobin.com which allows me to post 10 images. So I plan to not only post my latest images there as well but keep a running tally of my best images there too.

Continue reading Deep Sky Imaging

Astrophotography Part 3

Nikon D5100 flanked by D60

I knew I needed a new or different camera for astrophotograpy. The Nikon D60 (10.2 MP) DSLR I had at the time was not going to work for several reasons. The D60 is an entry level camera and while it was a good camera for shooting the kids and vacation stuff it was not very well suited for astrophotography. So the question to me was upgrade the DSLR or go with a dedicated astrophotography camera. The most economical and versatile choice was to go with a DSLR.

Nikon D5100 Top
Nikon D5100 Top

Most astrophotographers use Canon DSLRs rather than Nikon but having already been a Nikon consumer I felt it better to go with the Nikon.  Having amassed lenses and accessories from that manufacturer, not to mention already being familiar with Nikon’s software and menu structure, it just seemed logical to stay the course. Looking back on it that decision, it might not have been the best plan as most clip in filters are only available for Canon.

Continue reading Astrophotography Part 3

Astrophotography part 2

Celestron Advanced VX Equatorial Mount

I’ve heard on more than one occasion “the mount is the most important part of your astrophotography setup.” That’s usually followed with “focus more on the mount than the telescope” when it comes to putting together your imaging rig. Without a firm foundation a house is doomed to collapse. These suggestions and recommendations are sound.

It’s important to choose a mount and tripod that are stable, rigid, precise in their tracking abilities, rated to accept the total weight you plan to place on them during your imaging sessions and well tested with accessible and repeatable results. When it comes to stability and tracking for astrophotography your mount had better perform as advertised or your images will suffer no matter how much money you pour into your telescope and imaging cameras.

Continue reading Astrophotography part 2

astrophotography Part 1

I recently took the plunge and bought astrophotography gear including a telescope, a German equatorial mount, guide-scope and camera, and DSLR.  Getting serious about taking long exposure images of the night sky, and most importantly having them turn out decent, in most cases is an expensive endeavor.

Tripod mounted Nikon D60

I have enjoyed taking unguided images of the night sky for years. Its pretty simple. Get a camera, put it on a tripod, adjust the ISO and exposure length to the film or CMOS sensor and then see what you get. I have a page on this web site where I have listed tips on how to create those types of shots.  That goes back to the not so distant days of film and having to wait days to get your results.

While I was experimenting with star trail shots, various films, lenses, telescopes, ISO settings and exposures, I longed for the proper gear to take images of objects in the night sky to a much greater degree. By that I mean tracking faint objects of interest and taking multiple exposures that can then be combined or “stacked” using software such as DeepSkyStacker to produce a final image which is then processed in Adobe Photoshop or other photo editing software to bring out the fine details. Well, I’m finally at that point close to twenty years into this hobby.

In my next few blog posts I’ll outline the individual components of my new astrophotography rig. I’ll let you know what equipment I’m using, why I choose it specifically and how it’s worked out for me thus far. I’ll also share my first images and talk about what I’ve learned. 

Continue reading astrophotography Part 1

Total Lunar Eclipse 1-20-19

Total lunar eclipse of January 20, 2019.

It’s like deja’ vu all over again! Last year there was a total lunar eclipse that occurred on January 31, 2018. That TLE was sure fun to watch and photograph. What made it enjoyable was the eclipse took place as the Moon was setting and made for some good images with the landmarks and the horizon. In fact, the moon was actually eclipsed as dawn was coming on, and it was setting at the same time. There was a lot happening. This total lunar eclipse, which occurred less than a year later was much higher in the sky. The weather was not perfect. It was cold with high thin clouds and periods of thicker cloudiness initially but as the night and eclipse wore on the sky did clear out nicely.

Posted below are images I shot of the January 20, 2019 total lunar eclipse or if you prefer the “media hyped” naming convention then it would be the “super blood wolf moon – total lunar eclipse.” Super because this full moon occurred near perigee which is when the moon is a fraction closer to Earth. Blood because total lunar eclipses take on a reddish/orange hue due to light refracting through the Earth’s atmosphere which sucks out the blue light waves and lets the red ones run free to bath the moon in blood. Finally, the January full moon is commonly called the “wolf” moon. Had this eclipse occurred in March when the full moon is known as the “worm moon,” they would have been calling it the “super blood worm moon,” or in August, the sturgeon moon. You get the idea.

Continue reading Total Lunar Eclipse 1-20-19

Total Lunar Eclipse Images

Here are images I shot of this morning’s total lunar eclipse using a Nikon D60 with a Nikkor 50-200mm lens. These images were shot at Richard Simpson Park on Lake Arlington in Arlington, TX.

Continue reading Total Lunar Eclipse Images